The kitchen island is the heart of the modern kitchen — a place for cooking, eating, and connecting. More than just a countertop, it adds storage, workspace, and style. But to get it right, you need smart planning. From size and layout to materials, lighting, and avoiding common mistakes, every detail matters. A well-designed island improves function, flow, and daily life. This guide covers everything you need to create a beautiful, practical kitchen centerpiece that works perfectly for your home. Let’s get started.
When it comes to modern kitchen design, the island has become the centerpiece — a hub for cooking, dining, socializing, and storage. But no matter how stunning your materials or how advanced your appliances, a poorly sized or misplaced island can disrupt the entire kitchen’s function and flow. The truth is, a successful kitchen island isn’t about chasing trends or maximizing square footage — it’s about respecting the space and serving the people who use it.
To create a truly functional and harmonious kitchen, designers must follow five core principles when planning the size and layout of a kitchen cabinets island. These principles ensure that the island enhances, rather than overwhelms, the kitchen’s overall design.
The most common mistake in kitchen design is making the island too large for the space. A massive island might look impressive in a magazine, but in a real-world kitchen, it can block movement and create congestion. The key is proportion.
A general rule of thumb is that the island should occupy no more than 10% of the total kitchen area. For example, in a 10' x 13' (130 sq. ft.) kitchen, the island should ideally be around 13 sq. ft. — such as 2.5' x 5' or 2' x 6.5'. Anything larger risks dominating the room and making it feel cramped.
Equally important is the space around the island. For comfortable circulation, maintain at least 42 inches between the island and surrounding kitchen cabinets or countertops. If two people frequently work in the kitchen at the same time, increase this to 48 inches.
If the island is near a refrigerator or a swinging door, allow even more space to accommodate door swings and avoid collisions.
Think of the island as a piece of furniture in a living room — you wouldn’t place a sofa so close to the coffee table that you can’t walk around it. The same logic applies in the kitchen.
The kitchen island isn’t just a visual centerpiece — it’s a functional workstation. To maximize efficiency, it should be integrated into the kitchen work triangle: the relationship between the refrigerator, sink, and cooktop.
When designing your kitchen cabinet designs, consider whether the island will house one of these key elements. For example, placing the sink or cooktop on the island turns it into a primary work zone. This not only frees up perimeter space but also encourages social interaction, especially if one side of the island includes seating.
However, each leg of the triangle should be between 4 and 9 feet long, and the total perimeter should not exceed 26 feet. This ensures that movement between stations is efficient without being too cramped or too stretched.
If the island includes a cooktop, make sure there’s enough clearance on at least one side for food preparation and plating. If it includes a sink, allow 18 to 24 inches of countertop on one or both sides for cleanup and drying.

Great kitchen cabinet designs pay attention to alignment. A well-placed island doesn’t just “fit” — it feels intentional. Use centerlines and alignment cues to anchor the island within the space.
For example, align the island’s center with the range hood, a window, or the center of a kitchen peninsula. This creates a sense of balance and order. If the island includes seating, center the overhang with the base cabinetry or match it to the length of the main countertop.
These subtle alignments may go unnoticed by most people, but they contribute significantly to the overall feeling of a well-designed space. Think of it like framing a painting — proper alignment draws the eye and creates harmony.
While creativity is essential, practicality matters. The size of your kitchen cabinets island should also consider the standard dimensions of materials used in construction.
Countertop materials like granite, quartz, or solid surface typically come in slabs measuring 120 inches by 60 inches (10' x 5'). If your island exceeds these dimensions, you’ll need a seam — which can affect both aesthetics and durability. To avoid unnecessary seams, design your island to fit within standard slab sizes whenever possible.
Similarly, base cabinets for kitchen islands usually come in standard widths — 24", 30", 36", and 48". Custom sizes are possible but more expensive. Planning your island around these standard modules can save time and money during installation.
A beautiful island is useless if it’s uncomfortable to use. Consider how people actually move and work in the kitchen.
Will you be able to reach the center of the island without straining? If the island is wider than 42 inches, you may struggle to access items stored in the middle of deep drawers or cabinets. In such cases, consider dividing the island into two narrower sections or using pull-out organizers.
Also, think about seating. If you plan to include bar stools, ensure there’s enough knee space — a minimum of 12 inches of overhang beyond the countertop edge. The standard countertop height is 36 inches, but if you’re adding seating, raise one side to 42 inches for a comfortable bar-height experience.
Accessibility also extends to storage. Well-designed kitchen cabinet designs for islands include a mix of drawers, pull-out shelves, lazy Susans, and vertical dividers. Avoid creating deep, open cavities that become dumping grounds. Instead, use smart storage solutions that keep everything organized and within easy reach.
The size of your kitchen cabinets island should never be arbitrary. It must be a thoughtful response to the room’s dimensions, workflow, and lifestyle. Whether you’re designing a compact galley kitchen or a spacious open-concept layout, these five principles — circulation, work zones, alignment, material limits, and ergonomics — form the foundation of a successful design.
Remember, the goal isn’t to fill the space, but to optimize it. A well-proportioned island enhances your kitchen cabinet designs by improving functionality, boosting storage, and creating a natural gathering spot. When done right, the kitchen cabinets island becomes more than just a piece of furniture — it becomes the heart of the home.
By respecting these principles, you ensure that your kitchen is not only beautiful but also practical, balanced, and built to last.

Choosing the right size for your kitchen island isn’t guesswork — it’s a precise process that depends on your kitchen size, layout, and daily usage. Even the most beautiful island can become a frustrating obstacle if it doesn’t fit properly. To avoid costly mistakes, follow these proven calculations and guidelines to design an island that enhances both form and function.
One of the most reliable rules in kitchen design is the 10% rule: your kitchen island should take up no more than 10% of the total floor area of the kitchen.
This simple formula helps maintain balance and prevents the island from dominating the space. For example:
If your kitchen measures 10 feet by 12 feet (120 sq. ft.), the island should be no larger than 12 sq. ft. — such as a 2' x 6' or 3' x 4' island.
For a larger kitchen of 15' x 16' (240 sq. ft.), a 10' x 2.4' or 8' x 3' island would be appropriate.
Going beyond 10% can make the room feel crowded, especially if there are multiple users or adjacent dining areas. Staying within this range ensures your kitchen layout remains open, functional, and comfortable.
Even if your kitchen size allows for a large island, you must leave enough room around it for safe and easy movement. These clearance standards are essential for a smooth kitchen layout:
Between island and walls or cabinets: At least 42 inches for one cook; 48 inches if two people will be working at the same time.
Near appliances: If the island is opposite a refrigerator or oven, allow 36–42 inches to fully open doors without blocking the path.
Near door swings: If a door opens into the kitchen, ensure at least 36 inches of clearance from the island to the edge of the door when open.
These measurements are not optional — they are based on building codes and ergonomic research. Ignoring them can lead to awkward movements, collisions, and even safety hazards.

If you plan to include seating at your island, size and overhang become even more important. Whether you’re enjoying breakfast or hosting guests, comfort is key.
Seat width: Allow 22 to 24 inches per person for comfortable seating.
Overhang: Provide at least 12 inches of countertop overhang beyond the base cabinetry to accommodate knees and legs.
Height: Standard countertop height is 36 inches. For bar-style seating, raise the counter to 42 inches and use taller stools.
For example, if you want space for three people to sit comfortably, your island should be at least 72 inches long (3 x 24"). Add 12 inches of overhang, and make sure the rest of the kitchen layout allows for easy access from both sides.
Before construction begins, test your island size and placement in real life. Use painter’s tape to outline the island and clearance zones on your kitchen floor. Then, live with it for a day or two.
Walk around, open cabinets, simulate cooking, and move between appliances. This simple exercise can reveal problems that floor plans might miss — such as a narrow path or a blocked drawer.
This method is especially helpful when working with smaller kitchen sizes, where every inch counts. It turns abstract numbers into real-world experience.
Your kitchen layout plays a big role in how large an island can be. Here’s how different layouts affect island sizing:
Galley kitchens (two parallel walls): Islands are rare unless the kitchen is very wide (at least 12 feet). In most cases, a narrow, long island (2' x 6') can work if there’s 48" clearance on both sides.
L-shaped kitchens: These offer great flexibility. An island can be placed in the open corner, typically 3' x 5' to 4' x 6', depending on kitchen size.
U-shaped kitchens: With three walls of cabinetry, the center is naturally open. This layout often supports larger islands (4' x 6' or more), especially in spacious kitchens.
Open-concept layouts: When the kitchen flows into a living or dining area, the island often becomes a visual anchor. In these cases, size can be more generous, but still follow the 10% rule to avoid overwhelming the space.
Always consider how the island connects to the rest of the home. In open layouts, the island should feel like a natural extension of the kitchen layout, not an isolated block.
Not every kitchen can or should have an island. If your kitchen size is under 100 square feet, adding an island may do more harm than good. Small kitchens often benefit more from efficient kitchen cabinet designs, wall-mounted storage, and compact appliances.
Similarly, if your kitchen layout already feels tight or has limited access points, an island could make movement difficult. In these cases, consider a peninsula, rolling cart, or extended countertop as a flexible alternative.
The perfect island size isn’t about being big — it’s about being right for your space. By using the 10% rule, respecting clearance standards, planning for seating, and matching your island to your kitchen layout, you can create a design that feels natural and functional.
Remember, your kitchen size sets the boundaries, but smart planning determines the outcome. Whether you have a cozy 100 sq. ft. kitchen or a grand 300 sq. ft. space, the key is balance. A well-sized island improves workflow, adds storage, and creates a welcoming heart for your home.
With these calculations in hand, you’re ready to move from idea to reality — building an island that fits not just your kitchen, but your life.

A kitchen island is much more than a decorative centerpiece or extra countertop space. When designed with purpose, a kitchen cabinets island becomes the most functional and versatile element in the entire kitchen. It can house appliances, provide storage, support cooking and cleaning tasks, and even serve as a dining or homework station. To maximize its potential, it’s essential to think beyond aesthetics and plan for smart functional integration.
Let’s explore how to turn your kitchen cabinets island into a true multi-tasking hub.
One of the most practical uses for a kitchen cabinets island is to install a sink. This transforms the island into a dedicated cleaning and prep zone, especially in open-concept homes where the cook wants to stay engaged with guests.
However, placing a sink on the island requires careful planning:
Size matters: The island should be at least 7 feet long to accommodate the sink and leave enough counter space on both sides for prep and drying.
Clearance: Allow 18 to 24 inches of countertop on each side of the sink for optimal workflow.
Plumbing: Unlike perimeter sinks, an island sink requires underfloor plumbing. This must be planned during the initial construction or renovation phase. Retrofitting can be costly and complex.
A well-placed sink on a kitchen cabinets island also improves the kitchen work triangle, especially if the refrigerator and cooktop are on adjacent walls. It keeps all three key zones within easy reach.
For many homeowners, placing a cooktop or range on the island turns cooking into a social activity. Whether you’re sautéing vegetables or flipping pancakes, you can face your family or guests while preparing meals.
But this design choice comes with important considerations:
Ventilation: Unlike wall-mounted ranges, an island cooktop requires a range hood suspended from the ceiling or a down-draft ventilation system.
Ceiling-mounted hoods are more effective at capturing smoke and odors but require proper ceiling height and ductwork.
Down-draft vents are sleek and space-saving but less efficient, especially for high-heat cooking.
Safety and spacing: Maintain at least 30 inches between the cooktop and any overhead cabinets or hood. If the island includes seating, ensure there’s a safe distance (at least 12 inches) between the cooking surface and the edge where people sit.
Fuel type: Gas lines must be run under the floor, so early planning is crucial. Electric or induction cooktops are easier to install but still require dedicated circuits.
Only install a cooktop on a kitchen cabinets island if the space allows for proper ventilation, clearance, and workflow.
Modern kitchens rely on appliances, and the island is no exception. Whether you’re using a stand mixer, blender, or charging devices, access to power is essential.
Follow these electrical guidelines for a functional kitchen cabinets island:
GFCI outlets: Install at least one ground-fault circuit interrupter (GFCI) outlet for every 9 square feet of countertop. These are required by code and protect against electrical shocks near water sources.
Placement: Avoid putting outlets directly behind large appliances like a toaster or coffee maker. Instead, place them along the side or back edge of the countertop, or use pop-up outlets that stay hidden when not in use.
Dedicated circuits: If the island includes a cooktop, dishwasher, or wine cooler, each should have its own dedicated circuit to prevent overloading.
Smart planning ensures that your kitchen cabinets island supports today’s tech-heavy lifestyle without cluttering the space with extension cords.

Storage is one of the biggest advantages of a kitchen cabinets island. Unlike wall cabinets, island storage is easily accessible from multiple sides, making it ideal for heavy or frequently used items.
To make the most of this space:
Use pull-out drawers and shelves instead of deep, hard-to-reach cabinets.
Include specialized organizers for pots, pans, cutting boards, and utensils.
Add a built-in trash or recycling center with slide-out bins — this keeps waste hidden and easy to access during cleanup.
Consider a wine rack, spice drawer, or appliance garage for small but valuable storage needs.
The goal is to turn your kitchen cabinets island into a high-efficiency storage hub that reduces clutter and saves time.
Few kitchen features encourage gathering like a well-designed island with seating. Whether it’s morning coffee with family or casual dinner with friends, the island becomes a natural social spot.
Tips for successful seating integration:
Overhang: Provide at least 12 inches of countertop overhang for knee space.
Height: Standard countertop height is 36 inches (for 24-inch stools). For bar-style seating, raise the counter to 42 inches (for 30-inch stools).
Clearance: Allow 24 inches per person, with 30 inches being ideal for comfort.
Backless stools are best for small spaces, as they can be tucked under when not in use.
When designed well, the kitchen cabinets island becomes more than a work surface — it becomes a dining area, homework station, or conversation corner.
If your kitchen size or layout makes a fixed island impractical, consider a rolling kitchen cabinets island. These mobile units offer flexibility — you can move them out of the way when needed or bring them closer to the stove or sink during cooking.
They’re ideal for:
Small kitchens with limited space
Homes that host large gatherings occasionally
Renters or those who prefer changeable layouts
Many rolling islands include built-in power, storage, and even small sinks or cooktops.
A kitchen cabinets island should never be an afterthought. When you integrate sinks, cooktops, storage, seating, and power with intention, you transform it into the most functional and dynamic part of the kitchen.
Remember: the best islands are not just beautiful — they are thoughtfully equipped to support your daily life. Whether you’re washing vegetables, frying eggs, helping with homework, or sharing a meal, your kitchen cabinets island can be designed to do it all — efficiently, safely, and comfortably.
By focusing on functional integration, you ensure that your island isn’t just a statement piece, but a true cornerstone of modern kitchen living.

Choosing the right materials for your kitchen island is about more than just looks. While color and texture matter, the true test of a material lies in how well it performs over time. A kitchen island takes more daily wear and tear than any other surface — from chopping and spills to heat and heavy objects. That’s why your choice of countertop, cabinetry, and finish should balance beauty, durability, and sustainability.
Let’s explore the most popular materials and how to select the best one for your lifestyle and values.
The countertop is the most visible and heavily used part of the kitchen island. Here’s a breakdown of common options:
Quartz (Engineered Stone)
Quartz is one of the most popular choices today. Made from 90% natural stone and 10% resins, it’s non-porous, stain-resistant, and requires no sealing. It comes in hundreds of colors and patterns, making it easy to match any style.
Pros: Durable, low maintenance, scratch and stain resistant
Cons: Can be damaged by extreme heat; limited outdoor use
Granite (Natural Stone)
Granite offers timeless beauty with unique veining and color variations. Each slab is one-of-a-kind, adding character to your kitchen. It’s heat-resistant and long-lasting when properly sealed.
Pros: Natural beauty, heat resistant, adds home value
Cons: Requires annual sealing; can stain if not maintained
Butcher Block (Wood)
Wood countertops bring warmth and a cozy, rustic feel. They’re ideal for food prep and can be sanded and refinished if scratched.
Pros: Gentle on knives, renewable, affordable
Cons: Not water-resistant; requires regular oiling; can show knife marks
Laminate
Modern laminates have come a long way. With realistic wood and stone patterns, they offer a budget-friendly option that’s easy to clean.
Pros: Affordable, wide variety of styles, easy to install
Cons: Not heat or scratch resistant; shorter lifespan
Stainless Steel
Often used in professional kitchens, stainless steel is hygienic, heat-resistant, and perfect for modern or industrial designs.
Pros: Sanitary, durable, fireproof
Cons: Shows fingerprints and scratches; can feel cold
Recycled Materials (Glass, Paper Composite, Concrete)
For eco-conscious homeowners, materials made from recycled glass, paper, or concrete offer unique looks and sustainable benefits.
Pros: Eco-friendly, distinctive appearance
Cons: Can be expensive; some require special care
The base of your kitchen island is only as good as the materials used for the cabinets. Common options include:
Solid Wood Kitchen Cabinet
Durable and beautiful, solid wood cabinets age gracefully and can be refinished. Hardwoods like maple, oak, and cherry are top choices.
Pros: Long-lasting, repairable, natural look
Cons: Expensive; can warp in high humidity
Plywood with Veneer
A cost-effective alternative to solid wood, plywood is strong and stable. A wood veneer gives it the appearance of real wood.
Pros: Resists warping, more affordable
Cons: Edges must be properly finished
Medium-Density Fiberboard (MDF)
MDF is smooth, consistent, and great for painted finishes. It’s often used in modern or semi-custom cabinets.
Pros: Smooth surface, holds paint well, affordable
Cons: Swells if exposed to water; not as strong as wood
For kitchen islands, solid wood or plywood is recommended due to their strength and ability to support heavy countertops.
As environmental awareness grows, more homeowners are choosing sustainable materials. Here’s how to make eco-friendly decisions:
Look for FSC-certified wood (Forest Stewardship Council), which ensures responsible forestry.
Choose low-VOC finishes and adhesives to improve indoor air quality.
Consider recycled or rapidly renewable materials, such as bamboo (a fast-growing grass) or recycled glass countertops.
Support brands that use local sourcing and energy-efficient manufacturing.
Sustainability doesn’t mean sacrificing style. Many green materials are beautiful, modern, and built to last.
The best material for your kitchen island depends on how you live:
Families with kids: Choose durable, easy-to-clean surfaces like quartz or laminate. Avoid materials that show every fingerprint or scratch.
Serious home cooks: Butcher block or stainless steel may be ideal for food prep, while granite handles heat from pots and pans.
Minimalist or modern lovers: Concrete, matte laminate, or sleek wood finishes create a clean, uncluttered look.
Eco-conscious homeowners: Recycled glass, bamboo, or FSC-certified wood align with green values.
Think about your daily routine — how often you cook, clean, entertain, and what kind of maintenance you’re willing to do.
Touch and see samples in person. Colors on screens can be misleading. View slabs and finishes in your kitchen’s lighting.
Test durability. Ask for sample swatches and try scratching or staining them to see how they hold up.
Balance cost and value. While high-end materials cost more upfront, they often last longer and increase your home’s resale value.
Keep it cohesive. Your kitchen island should complement, not clash with, the rest of your kitchen design.
Your kitchen island is a centerpiece — it should be as functional as it is beautiful. By choosing materials that are durable, practical, and sustainable, you invest in a space that will serve you well for years to come.
Whether you prefer the elegance of granite, the ease of quartz, or the warmth of wood, the right material will enhance both the look and performance of your kitchen. Make your choice with confidence, knowing it supports your lifestyle and values.
After all, the best kitchens aren’t just designed — they’re lived in.

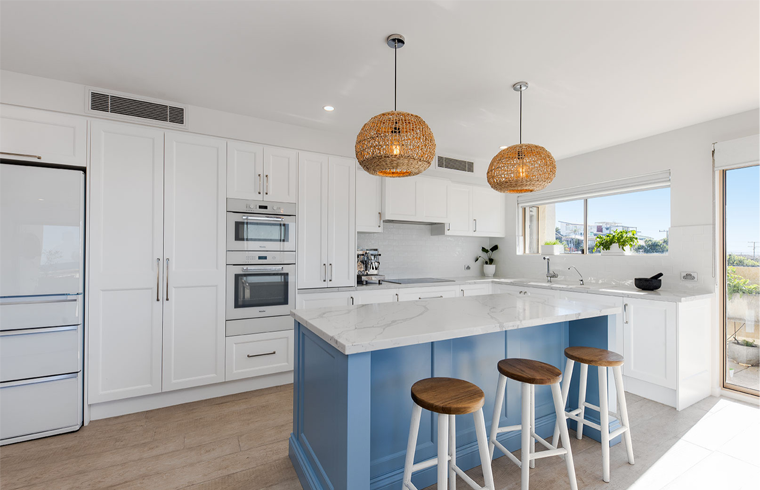
A kitchen island is more than a functional workspace — it’s a focal point of the kitchen. To make it stand out and feel inviting, lighting and design details matter just as much as size and materials.
Good lighting enhances safety, improves task performance, and sets the mood. Meanwhile, thoughtful aesthetics tie the island into the overall kitchen style, creating a balanced and beautiful space.
Let’s explore how to light and style your island with confidence.
The most common and effective way to light a kitchen island is with pendant lights hung above it. But not all lighting works the same — here’s how to get it right:
Number of lights: Use an odd number (1, 3, or 5) for visual balance. For islands 6 feet or longer, three pendants are ideal. For shorter islands, one or two will do.
Size and spacing: Each pendant should be about 1/3 the length of the island. Space them evenly, with at least 2 feet between fixtures.
Height: Hang pendants 30 to 36 inches above the countertop. If people will be standing or sitting underneath, make sure there’s at least 7 feet of clearance from the floor to avoid head bumps.
Brightness: Use bulbs with 40–60 watts (or equivalent in LED). For task lighting, aim for 300–500 lumens per foot of island length.
Style: Match the design of the lights to your kitchen’s theme — modern, rustic, industrial, or classic.
Don’t forget under-cabinet lighting on the island itself. LED strips or puck lights can illuminate the countertop for late-night snacks or early-morning coffee, adding both function and ambiance.
Your island should feel like a natural part of the kitchen, not an afterthought. To achieve this:
Color coordination: Use the same cabinet color as the rest of the kitchen for a unified look, or go bold with a contrasting island color (e.g., navy blue island in a white kitchen) to create a statement.
Material matching: Pair the island countertop with backsplash or flooring materials for cohesion. For example, use the same quartz on the island and sink area.
Design continuity: Carry hardware (knobs, handles) and edge profiles from the main cabinets to the island for a seamless style.
A well-designed island doesn’t shout — it enhances.
Even with careful planning, many people make avoidable errors when designing a kitchen island. Here are key tips and common mistakes to help you get it right the first time.
Think about traffic flow: At least two people often use the kitchen at once. Make sure there’s enough space to move around the island without bumping into each other.
Plan for the future: If you plan to age in place, consider accessible design — lower countertops, pull-out shelves, and easy-to-reach storage.
Include power in the island: Add outlets on the side or back of the island for small appliances. Pop-up outlets in the countertop are sleek and convenient.
Use the island for storage: Maximize space with deep drawers, pull-out trash bins, and spice racks. The island is often the most accessible storage area.
Make it multi-functional: Combine a prep zone, sink, and seating to get the most value from your island.
Even in large kitchens, an oversized island can block movement and make the space feel unbalanced. Stick to the 10% rule — the island should take up no more than 10% of your kitchen’s floor area.
You need at least 42 inches between the island and surrounding cabinets or walls. For two cooks, aim for 48 inches. Less than that feels cramped and unsafe.
Hanging pendants too high, too low, or unevenly spaced ruins both function and style. Always measure and mark positions before installation.
If you want bar stools, provide at least 12 inches of countertop overhang beyond the base cabinetry. Without it, knees will hit the cabinets.
Never install a stove or cooktop directly next to where people sit. Heat, steam, and splatter make it uncomfortable and unsafe. Leave at least 12–18 inches of buffer space.
If you want a sink or dishwasher in the island, plumbing must be installed under the floor. The same goes for gas lines or electrical circuits. These must be planned before construction begins.
It’s tempting to follow design fads, but your island should last 10–20 years. Pick timeless materials and colors that you’ll still love in the long run.
Use painter’s tape to mark the island and walkways on your floor. Live with the layout for a day. You might discover that a door swing or cabinet blocks your movement.
A well-designed kitchen island improves how you cook, eat, and connect with others. By focusing on smart lighting, cohesive aesthetics, and practical tips, you can avoid common pitfalls and create a space that’s both beautiful and functional.
Remember: the best islands are not the biggest or most expensive — they are the ones that fit perfectly into your life. Whether you’re a busy parent, a weekend cook, or someone who loves to entertain, your island can be designed to support your daily routines.
Take your time. Measure twice. Plan carefully. And don’t be afraid to ask for help from a designer or contractor.
With the right approach, your kitchen island won’t just be a feature — it will become the heart of your home.


We employ cookies to analyze website traffic and enhance your browsing experience. Data securely aggregated, privacy protected. See Privacy Policy for details.