Kitchen cabinets are more than just storage—they shape the entire look and functionality of your kitchen. Installing them correctly is essential, and while hiring a professional is always an option, many homeowners today are choosing to take on this task themselves. If you're confident with basic tools and ready for a rewarding project, this comprehensive step-by-step guide will walk you through the process of installing kitchen cabinets from start to finish.
Before you begin, assemble everything you'll need. Having your tools and supplies ready will save time and reduce frustration as you work.
Drill and driver bits
Level (preferably 4-foot)
Stud finder
Measuring tape
Clamps
Screwdrivers
Shims
Pencil and chalk line
Utility knife
Jigsaw (for cutting openings if needed)
Cabinets (base and wall)
Screws (typically 2½–3 inches for wall studs)
Cabinet hanging rails or ledger boards
Filler strips
Cabinet trim (if required)
Wood glue (optional)
Don't forget safety gear like gloves and protective glasses, especially if you're handling tools or cutting openings for plumbing or wiring.
The quality of your installation depends heavily on the accuracy of your measurements. At this stage, the goal is to define where your cabinets will sit and ensure that they follow level and plumb guidelines. Begin by measuring the height of your ceilings, the width of each wall segment, and the placement of appliances to determine how your cabinet layout fits into the overall kitchen plan.

Once measurements are complete, use a level and pencil to mark key reference lines directly onto the wall. The most important is the horizontal line that indicates the bottom of your upper cabinets. Typically, this is placed 54 inches from the finished floor—36 inches for the base cabinet height and 18 inches of space between base and wall units. Drawing this line across the full length of the installation wall provides a visual baseline to work from.
It's equally important to mark vertical lines to indicate cabinet edges. These help maintain proper spacing and serve as a placement guide for both individual cabinets and studs. If the floor or ceiling is uneven, you'll adjust your cabinet position using shims later, but your reference lines must be dead-level. Take your time here. Mistakes made during measuring and marking will echo through the rest of the installation process.

After your layout lines are in place, the next critical task is to find and mark all wall studs. Cabinets must be anchored into studs to ensure they stay securely mounted over time. Drywall alone cannot support the weight of fully loaded cabinets, and even the strongest anchors are a poor substitute for direct stud fastening.
Use a reliable stud finder to scan along the wall within your cabinet zones. When a stud is detected, mark it clearly with a vertical pencil line that extends at least as high as the tallest cabinet. Studs are usually spaced 16 inches apart, but this can vary in older homes or depending on construction methods. If you're unsure, confirm by measuring between two known studs.
Marking these lines early allows you to plan screw placement during cabinet mounting. You'll want to align cabinet backs so their support rails or solid sections fall directly over these stud lines. Missing studs later during installation can mean having to remove and reposition cabinets—not an easy fix once other units are already in place. Take care to verify stud locations carefully, especially near corners and doors where framing may differ.
For kitchen remodels, removing old cabinetry is a job in itself and one that must be done cautiously. It's easy to rush this step and end up with damaged drywall or broken components, which can complicate the new installation. Start by clearing all contents from existing cabinets and disconnecting any appliances or fixtures that might get in the way.
Remove the cabinet doors, drawers, and any adjustable shelves first to make the boxes lighter and easier to handle. If your existing cabinets are caulked or painted into place, use a utility knife to score along the edges where they meet the wall or adjoining cabinets. This helps reduce tearing when you pull them off. Then, unscrew the fasteners securing them to the wall or to one another. You may find hidden screws under hinges, inside corner joints, or beneath cover caps.
As the cabinets come down, watch out for plumbing and electrical lines that may have been cut through the backs of the boxes. If your layout involves reusing any of the wall or base structure, try to preserve it intact. Otherwise, plan to patch and repaint any surface damage after removal. This step also provides a perfect opportunity to inspect the condition of your walls and floor—especially if leveling or moisture issues are present.
No floor or wall is ever truly perfect, and cabinet installation quickly exposes these flaws. That's why it's critical to check for level and plumb before fastening anything permanently. Start by placing a long carpenter's level along the wall—both horizontally and vertically. Look for gaps between the level and surface that indicate dips or bulges.
If the floor isn't level, you'll need to determine the highest point in the room and begin your base cabinet installation there. Cabinets can be shimmed up, but they can't be lowered below the floor line. Uneven walls, especially those that bow outward or inward, may require some cabinet scribing or even trimming filler panels to close visible gaps.
Spotting these issues in advance allows you to make decisions calmly, rather than discovering them in the middle of mounting. It's far easier to adapt your strategy now than to uninstall a row of cabinets later just to correct a misalignment.

A ledger board is your best friend when hanging wall cabinets, especially if you're working solo. It provides a temporary shelf that supports the weight of the cabinets during installation, making alignment and fastening much easier.
To install it, screw a straight 1x3 or 1x4 wooden board directly into the wall studs, right along the bottom reference line you marked earlier for the upper cabinets. Make sure it's perfectly level—check it twice. This board takes the stress off your arms and lets you work with precision, particularly on long runs where cabinets need to remain perfectly aligned.
Once all upper cabinets are mounted, the ledger board can be removed, and any screw holes patched later.
Wall cabinets should always be installed before base cabinets—this gives you room to maneuver without obstruction. Begin in a corner or at one end of a straight wall, depending on your layout. Lift the first cabinet into position so it rests on the ledger board and aligns with your stud markings.
Once it's level and flush, drive screws through the sturdy parts of the cabinet back (such as hanging rails) into the wall studs. Use at least two screws per stud, top and bottom. If you're working alone, this is where cabinet jacks or temporary props can help keep everything steady while you secure the cabinet.
Continue mounting the remaining cabinets, one at a time. Clamp adjoining cabinets together at the face frames, drill pilot holes, and connect them with screws. Keep checking that everything remains level across the tops and aligned at the fronts. Cabinet runs can visually drift if you don't check constantly, especially over longer walls.
Attaching the cabinets to one another is what makes the entire row feel seamless. Once two cabinets are hung, use clamps to hold their face frames tightly together. Drill small pilot holes in inconspicuous spots on the inside edges, then insert cabinet screws or trim-head screws to join them.
Check that the faces are flush and level before tightening. If doors or drawers are pre-installed, you may want to remove them temporarily to get better access to the connection points. With multiple cabinets, it's best to attach all face frames before anchoring the cabinets fully to the wall. That way, you can make micro-adjustments across the whole run.
The goal is to make the cabinets behave like a single unit—clean lines, flush faces, no gaps.

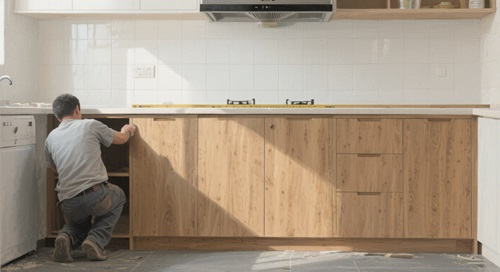
With the uppers secured, it's time to move on to the base cabinets. Start from the same point as your upper cabinet run—either the corner or a fixed end—and work outward. Begin by placing the first cabinet in position and checking it for level side-to-side and front-to-back.
Shimming is typically required to get the cabinet perfectly level and plumb. Place wood or composite shims under the cabinet as needed. It helps to leave a small gap between the cabinet and the wall for final alignment. Once you're happy with the fit, secure it lightly to the wall studs through the back panel.
Repeat this process for each base cabinet. Before fully fastening them to the wall, join face frames and clamp everything together—just as with the uppers. Constantly check alignment across the tops, since your countertop will depend on this accuracy later.
Once all base units are roughly in position, the focus shifts to precision. Use a long level to check across multiple cabinets. If there's any wobble or if the bubble drifts out of center, adjust your shims accordingly.
You can use additional shims at the back or sides if needed to keep the cabinets plumb. When everything is aligned, screw the cabinets to each other through the face frames and secure them to the wall. Be careful not to overtighten and pull the cabinet boxes out of alignment.
Trim off any excess shim material that sticks out at the bottom. Later, your toe kick board or base trim will cover these areas for a clean finish.
Once everything is level and aligned, you can finish securing the base cabinets permanently. Drive screws through the solid back sections into the wall studs—two at the top and two at the bottom of each cabinet is a good standard.
If your cabinets have cutouts for plumbing or wiring, use care to avoid hitting pipes or lines with screws. When installing around sinks or ranges, make sure there's enough clearance for these fixtures to be dropped in later without shifting the cabinetry.
By the time this step is done, you should have a strong, stable base that feels rock solid when you apply pressure—no wobble, no squeak.

If your cabinets came with pre-attached doors and drawers, you're almost done. Otherwise, now's the time to install them. Begin with door hinges—typically they attach with just two screws and snap into pre-drilled holes. Check each door for alignment and adjust the hinge screws as needed to fine-tune the position.
Next, insert drawers and check for smooth motion. Some systems use soft-close slides that need to be clicked in or aligned on rails. If you're installing handles or knobs, mark consistent spacing using a template or jig, then drill and screw them in place.
Proper alignment here makes a huge visual impact—crooked doors or uneven handles will catch the eye immediately, even in a beautifully built kitchen.
With the cabinets in place, you can install trim accessories such as crown molding, light rails, toe kicks, and filler strips. These finishing details are what give the installation a polished, integrated appearance. Nail or glue toe kicks into place along the base and cover any seams or gaps with matching trim.
Wipe down all cabinet surfaces to remove dust, fingerprints, or pencil lines. Patch any holes from temporary screws or ledgers, and do a final inspection to ensure everything is tight, level, and clean.
At this point, your kitchen should be fully cabinet-ready for countertops, backsplashes, and final plumbing or electrical work. Congratulations—you've just completed a project that adds lasting function and beauty to your home.
Installing kitchen cabinets may seem like a daunting job at first, but with the right preparation, patience, and tools, it becomes a rewarding DIY achievement. By following each step carefully—measuring, leveling, securing—you can ensure your cabinets not only look great but function reliably for years to come.
Installation plays a key role in making your kitchen project a success. We offer detailed guide drawings and step-by-step videos to help you install and assemble your kitchen easily. Our team is always available to assist, and we can also send professional technicians to your jobsite if needed. For support Contact us at [email protected].


We employ cookies to analyze website traffic and enhance your browsing experience. Data securely aggregated, privacy protected. See Privacy Policy for details.